Week 2
Week 2

NEW - Download the all-in-one PDF!
The pattern for this CAL is now available as an all-in-one PDF! Visit the Kirsten's website for more information!
Week 2
Stitches
- ch chain
- dc double crochet
- ss slip stitch
- st stitch
Tips & tricks
- If you find it hard to keep track of the rows (for example, which rows belong to the separator) take a contrast yarn and weave that horizontally through your rows on the top and bottom. When you finish, take your contrast yarn out.
- This embroidery pattern is most easily created if you start at one side of the pattern and work your way through row by row.
- The row numbers in purple indicate the row count when you count the rows continuously throughout the weeks.
Yarns
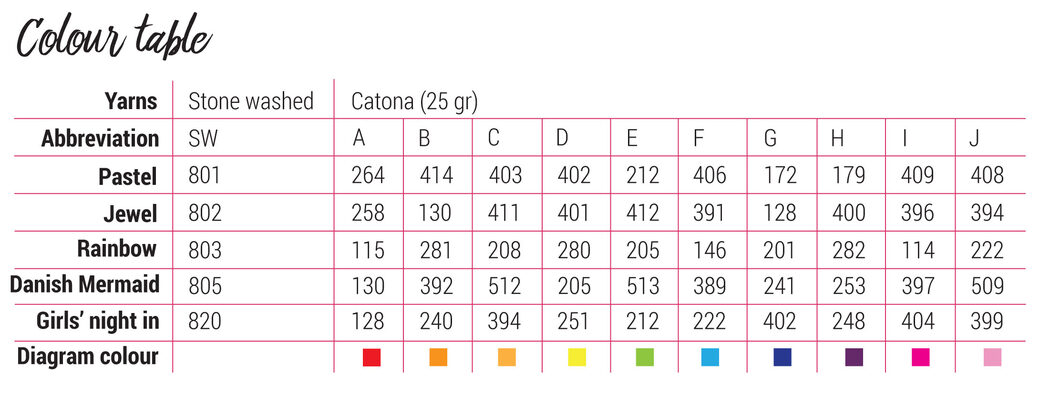
See the colour table for used yarns.
Hooksize: 4.5mm (US Size 7) (optionally 4.0mm (US size G/6)).
Gauge: 19 dc and 19 rows = 10cm (4in).
Pattern
Release stitchmarker from previous week. ch1, turn.
Rows 1-23 59dc across, ch1, turn.
Row 24 59dc across, Place stitchmarker in last stitch.
Separator
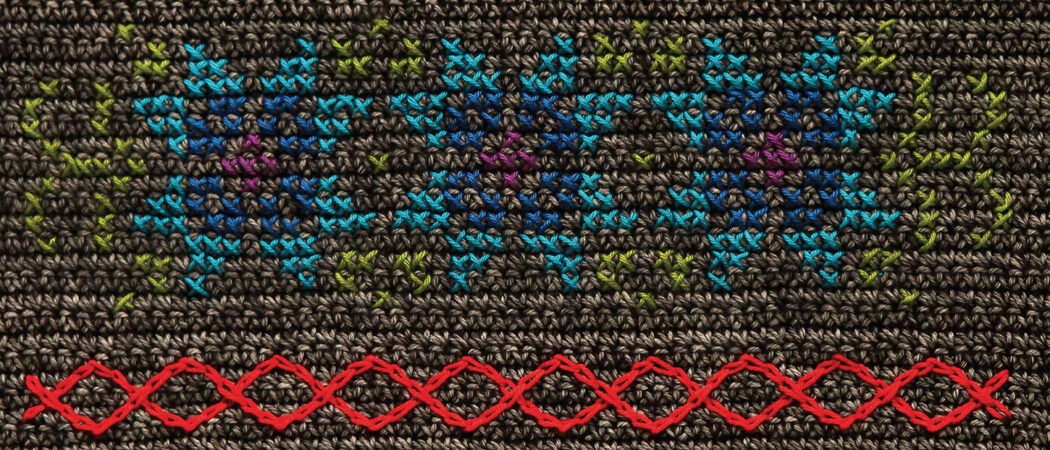
The separator is crocheted in rows 1-7 (rows 24-30). Take colour A and use a 4.0 mm crochet hook, if you tend to chain loosely. If it pulls too much or if your shawl becomes concave at the ends, switch to a larger hooksize for the separator.
Separator row 1 Keep your yarn at the wrong side of your shawl. Stick your hook top-down in between the 3rd and 4th st from row 5. Pull up a loop, stick your hook in between the 4th and 5th st from row 4, pull up a loop, pull through loop on hook (ss made). Pull up loop between the 5th and 6th st from row 3, make ss, pull up loop between the 6th and 7th st from row 2, make ss. Pull up loop between the 7th and 8th st from row 1, make ss. First diagonal line made.
Pull up loop between the 8th and 9th st from row 2, make ss. Pull up loop between the 9th and 10th st from row 3, make ss. pull up loop between 10th and 11th st from row 4, make ss. Pull up loop between 11th and 12th st from row 5, make ss, pull up loop between the 12th and 13th st from row 6, make ss.
Continue making diagonal ss lines. Every repeat consists of 10 slip stitches, 5 diagonally up and 5 down. End with making a ss over the 4th-to-last dc from row 3, meaning that your last diagonal line consists of 4 instead of 5 ss. Cut yarn.
Separator row 2 Pull up a loop in between the 3rd and 4th st from row 2, pull up a loop in between the 4th and 5th st from row 3, make ss, pull up a loop in between the 5th and 6th st from row 4, make ss (so over the ss from your other row!), pull up a loop in between the 6th and 7th st from row 5, make ss, pull up a loop in between the 7th and 8th st from row 6, make ss. Pull up loop between the 8th and 9th st from row 5, make ss. Pull up loop between the 9th and 10th st from row 4, make ss. pull up loop between 10th and 11th st from row 3, make ss (so over the ss from your other row!). Pull up loop between 11th and 12th st from row 2, make ss, pull up loop between the 12th and 13th st from row 1, make ss.
Continue making diagonal ss lines. Every repeat consists of 10 slip stitches, 5 diagonally up and 5 down. End with making a ss over the 4th-to-last dc from row 5, meaning that your last diagonal line consists of 4 instead of 5 ss. Cut yarn.
Embroidery
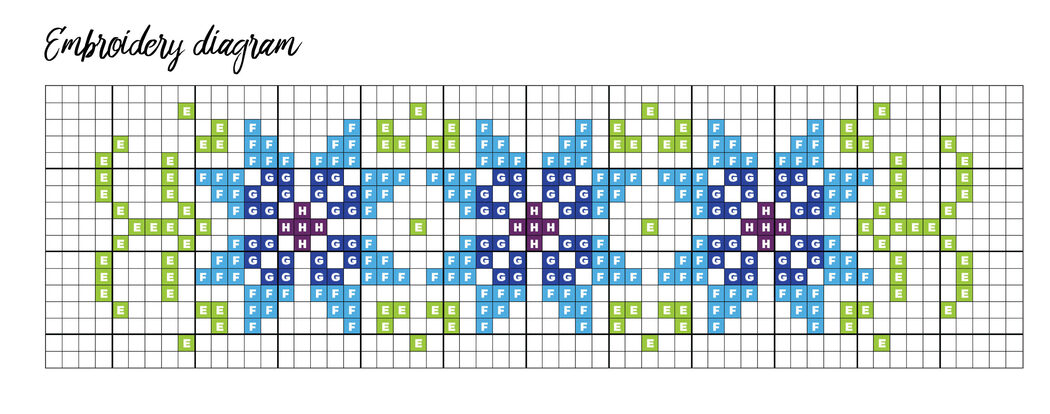
Work your embroidery on rows 8-24 (rows 31-47) in cross stitch according to the embroidery scheme, with row 8 being the bottom, and row 24 being the top of your embroidered motif. You read the scheme as follows:
Every square represents a crocheted stitch in your shawl. The white squares will not be embroidered. The coloured squares represent the cross stitches you’re going to make. in every square there’s a letter, corresponding to the colour you use for the embroidery.
For details regarding how you embroider read the Tips & Tricks document, or watch the video tutorial provided for this week.
Week 2 - Colour Table

Week 2 - Embroidery diagram

Week 2 - Separator diagram
